What Is the taskeng.exe Popup? Is It Safe?

If you’re a Windows user, you may have encountered the taskeng.exe popup at some point. This executable program runs various tasks in the background and can often cause confusion or concern.
In this article, we’ll examine what taskeng.exe does and whether or not it’s a virus. We’ll also cover common problems associated with this file and how to fix them if they occur.
Table of Contents
- What is taskeng.exe?
- Is taskeng.exe a Virus?
- How to Verify the Authenticity of taskeng.exe
- How to Remove Taskeng.exe Virus
- Boot in Safe Mode With Network
- Remove the taskeng.exe Virus Manually
- Remove the taskeng.exe Virus From Your Browser
- Disable User_Feed Synchronization
- Run an Antivirus Scan
What is taskeng.exe?
Taskeng.exe is a legitimate Windows executable program that schedules and runs various tasks in the background. It’s commonly called the Task Scheduler Engine and is a built-in component of the Windows operating system. Taskeng.exe is responsible for managing scheduled tasks, which are typically automated processes that run at a specified time or on a particular event.
Task Scheduler is a powerful tool that can automate many tasks, from running backups to performing system maintenance. System administrators and power users commonly use it to streamline workflows and improve efficiency.
Can I Delete taskeng.exe?
No, you should not delete or otherwise modify taskeng.exe as it is an integral part of the Windows operating system. If you do so, you may experience errors or instability when using your computer, rendering it unusable.
Is taskeng.exe a Virus?
Given its background operations and sometimes unexpected popup appearance, taskeng.exe may be mistaken as a virus by some users. However, it’s important to note that taskeng.exe is a legitimate Windows operating system component, not a virus or malware.
That being said, some malware or viruses can disguise themselves as taskeng.exe or use it to hide their activities. If you suspect that taskeng.exe is behaving suspiciously or consuming an unusual amount of system resources, running a virus scan using reputable anti-malware software is important.
The following characteristics can identify the genuine Microsoft taskeng.exe file:
- It is stored in the C:\Windows\System32 folder.
- Its size varies depending on the version of Windows OS and can be either 192,000 bytes, 169,472 bytes, 171,520 bytes, 169,984 bytes, 166,400 bytes, 237,568 bytes, 359,936 bytes, 190,464 bytes, 240,640 bytes, 239,616 bytes, 356,352 bytes, 355,328 bytes, 388,608 bytes, 192,512 bytes, or 924,632 bytes.
- It is not visible to the user.
- It comes with an available program description.
If any of these characteristics do not match, it may indicate the presence of a taskeng.exe virus on the computer, which should be removed immediately.
How to Verify the Authenticity of taskeng.exe
You can verify that the taskeng.exe popup is legitimate by following these steps:
- Check the file location: The legitimate taskeng.exe file is in the “C:\Windows\System32” folder. If you find the file in a different location, it may be a sign of malware.
- Check the digital signature: The legitimate taskeng.exe file should be digitally signed by Microsoft. Right-click on the taskeng.exe file and select “Properties.” Click on the “Digital Signatures” tab and check if the signature is valid and issued by Microsoft.
- Run a malware scan: Run a scan using reputable anti-malware software to ensure that your system is clean, and that taskeng.exe is not being used as a disguise by malware.
By following these steps, you can ensure that the taskeng.exe file on your system is authentic and not a sign of malware. It’s always important to remain vigilant and proactively protect your system from threats.
How to Remove Taskeng.exe Virus
If you suspect that the taskeng.exe file on your system is a virus, it’s important to remove it immediately. Use these solutions to get rid of the taskeng.exe virus:
1. Boot in Safe Mode With Network
If your computer is infected with malware, especially ransomware, you should boot in Safe Mode with Networking. This will allow you to access the internet and download anti-virus software that can be used to scan and remove the virus.
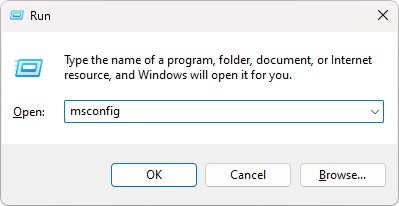
- Press the Windows + R keys on your keyboard to launch the Run utility. Type in “msconfig” without the quotes and click the OK button.
- Switch to the “Boot” tab using the header menu. Here, make sure that you select your current operating system, then select “Safe boot” and “Network” from the Boot options.
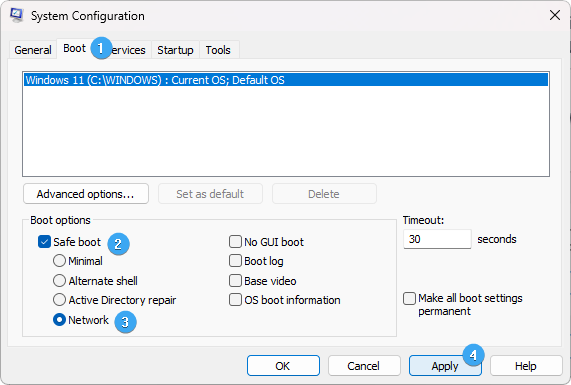
- Click the “Apply” button to finalize the changes and reboot your system. This will allow you to access your files.
2. Remove the taskeng.exe Virus Manually
It can be a simple process to remove the taskeng.exe virus if you can access your files. Most likely, any program that states it is taskeng.exe is malicious software and must be uninstalled immediately, followed by removing all its malicious components.
- Press the Windows + R keys on your keyboard to launch the Run utility. Type “appwiz.cpl” without the quotes and click OK. This will take you to the “Programs and features” page in Control Panel.

- Look for any suspicious apps, or apps that claim to be the “taskeng.exe” file. If you find one, select it, and click the “Uninstall” button.

- Follow the on-screen steps to remove the application.
3. Remove the taskeng.exe Virus From Google Chrome
Web browsers are the primary target of malicious software, so you should check your Google Chrome settings for any suspicious activity caused by malware. Here’s how to remove the taskeng.exe virus from Chrome:
- Open Google Chrome and click the three-dots icon in the window’s upper-right corner. Select “Settings” from the menu.
- In the left menu, select “Extensions” and see if there are any suspicious extensions. If you find an extension you don’t recognize, click the “Remove” button next to it to remove it.

- Return to the Settings page, and select “On startup” from the left-side menu. If the virus sets a specific home page, remove them or select “Open the New Tab page.”

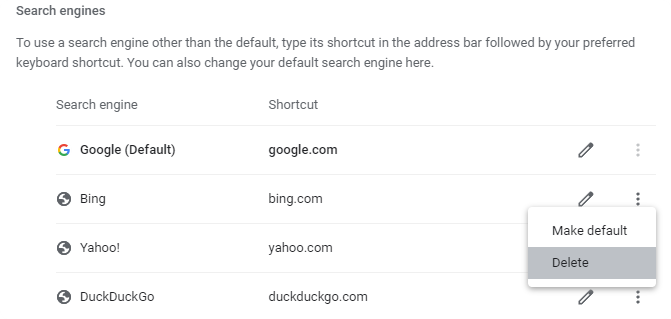
- Next, click “Search engine” from the left-side menu and “Manage search engines and site search.”
- In the default search settings list, locate the unknown search engine and click on the “Delete” option from the menu next to it. Select your preferred search engine and click on “Make default.”
4. Remove the taskeng.exe Virus From Firefox
Another popular browser targeted by the taskeng.exe virus is Firefox. Here’s how to remove the taskeng.exe virus from Firefox:
- Launch Mozilla Firefox and open the menu in the top-right corner. From here, select “Add-ons and themes.”

- Select “Extensions” from the menu on the left, then remove any suspicious extensions or extensions you don’t remember installing.

- Next, open the menu and click on “Settings.”
- In the “General” tab, click the “Restore to Default” button under the Startup category. This will reset your home page in case it is changed.
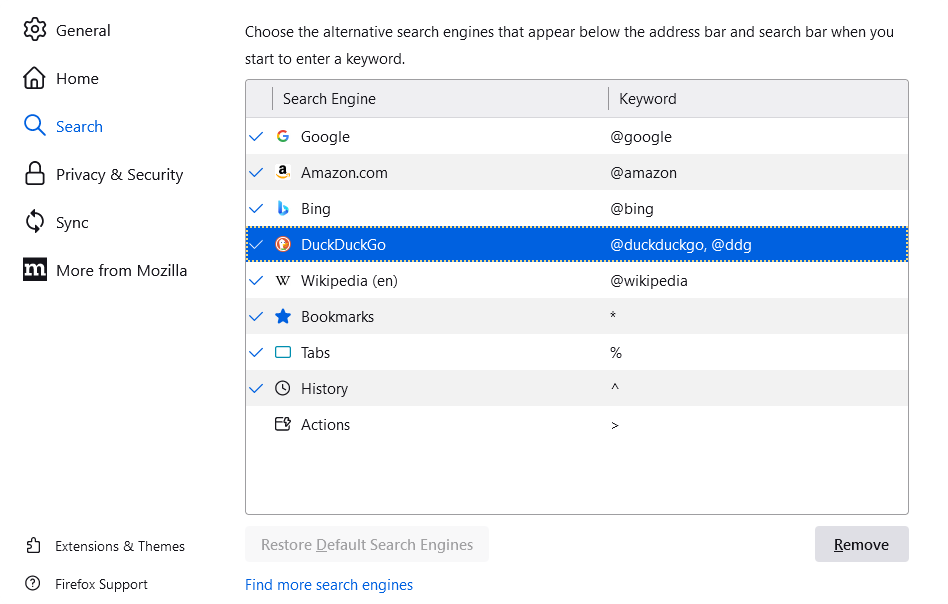
- Next, switch to the “Search” tab and remove any search engines you don’t recognize.
5. Remove the taskeng.exe Virus From Microsoft Edge
Microsoft Edge is the default browser on Windows 10 and Windows 11. Because of this, malware often targets the browser to ensure maximum exposure. Here’s how to remove the taskeng.exe virus from Microsoft Edge:
- Open Microsoft Edge, and then click on the menu in the top right corner of the browser window. Here, select “Extensions” and then click on “Manage extensions.”
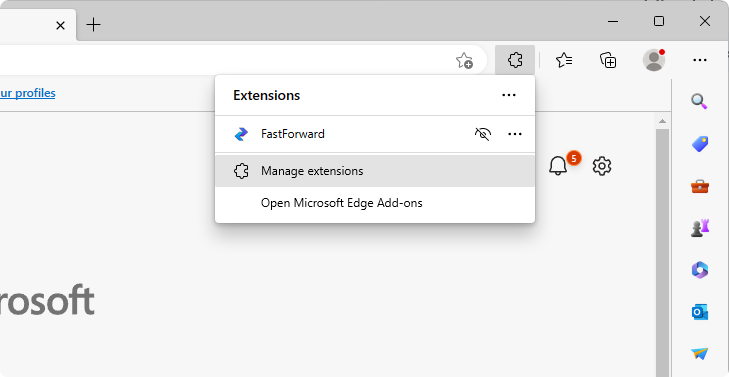
- Delete any extensions you don’t recognize or any that have a suspicious name. To do this, just click on the “Remove” button.

6. Disable User_Feed Synchronization
You can get rid of the random appearance of the taskeng.exe window by deactivating a concealed task in the Task Scheduler. It has been discovered that a hidden task named “User_Feed_Synchronization” is frequently the cause of this problem. To disable it from the Task Scheduler, follow the steps outlined below:
- Press the Windows + R keys on your keyboard to launch the Run utility. Type in “taskschd.msc” without the quotes and press OK.

- Right-click on “Task Scheduler Library” from the left-side pane. In the context menu, go to “View” and then enable “Show Hidden Tasks.”

- Find “User_Feed_Synchronization” from the task list, and then delete or disable it.

7. Run an Antivirus Scan
You should run an antivirus scan if you’ve completed all the steps above but are still concerned that your system may be infected. This will identify any malicious files and help to remove them from your system. You can use the built-in Windows Defender or third-party antivirus software to perform the scan.
Here’s how to perform a full system scan using Windows Defender:
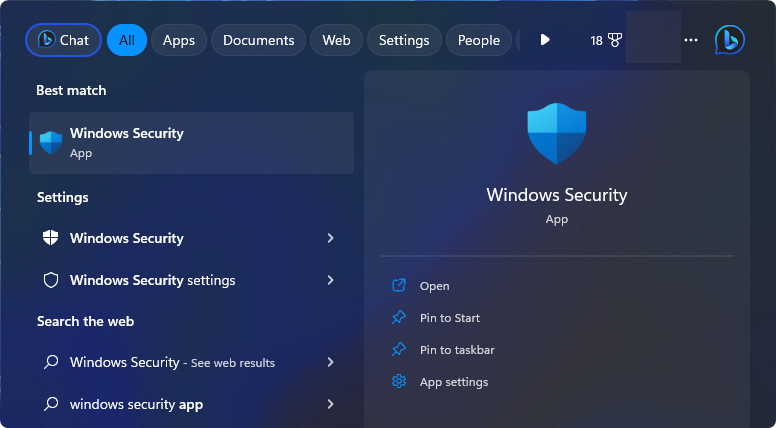
- Bring up the Search feature from your taskbar or by pressing the Windows + S keyboard shortcut, and type in “Windows Security.” Launch the app from the search results.
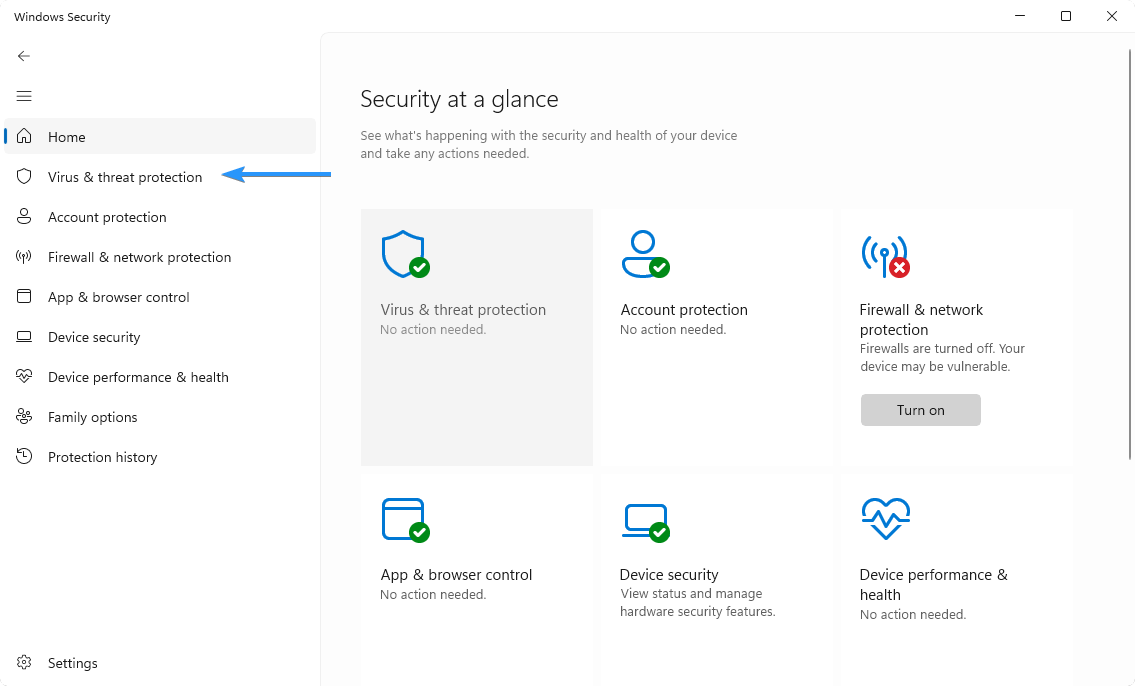
- Click on “Virus & threat protection” from the available options.
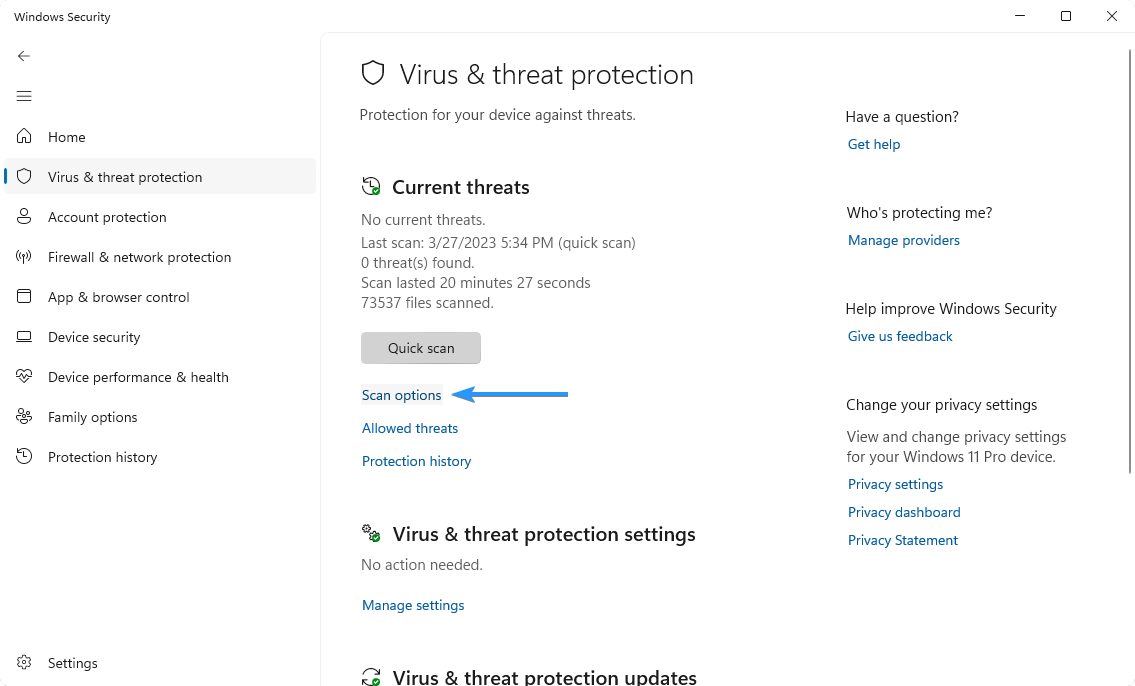
- You’ll find your scan options under the “Current threats” header. Before you begin a system scan, click on the “Scan options” link.
- First, select the “Full scan” option. This is going to check all files and apps on your hard disk. Next, click the “Scan now” button to get started.

- It’s important to note that this scan may take longer than an hour based on how many files you have stored on the drive. If the scan detects any anomalies and malicious files, it’ll immediately quarantine and disable them.
While third-party apps are convenient, most of them aren’t free. However, here at SoftwareKeep, you can get reliable antivirus software at an affordable price. With our premium antivirus solutions, you can rest assured that your system is secure from malicious threats.
Conclusion
While taskeng.exe is a legitimate Windows executable program, it can be used by malicious software to disguise itself and infect your computer.
If you suspect that the taskeng.exe file on your system might be malicious, it’s important to take steps to remove it from your system immediately. We recommend using reliable antivirus software and remaining vigilant regarding online threats to stay safe online.
We hope this article has provided the information you need to protect yourself from malicious software and keep your computer safe.
One More Thing
We’re glad you’ve read this article. 🙂 Thank you for reading.
If you have a second, please share this article on your socials; someone else may benefit too.
Subscribe to our newsletter and be the first to read our future articles, reviews, and blog post right from your inbox. We also offer deals, promotions, and updates on our products and share them via email. You won’t miss one.


 Microsoft Office
 Microsoft Windows


 CAD
CAD Multimedia
 VPN
VPN Tools & Utilities


